


I’m a bit of an idiot when it comes to code sometimes, so when I start learning a new language or library, I appreciate simple idiot-proof guides. This is going to be an ELI5 completely Idiot proof money-back guarantee guide.
So if you are completely new to programming or python, you shouldn’t struggle to follow along. However, if you are a seasoned programmer, this will still be of use; just skip the initial sections.
We will cover the following:
- Getting set up with an IDE
- Getting packages installed
- Setting up a Blockfrost account
- Creating private and public keys and creating an address
- Sending a transaction
- Using Blockfrost API to check your transaction
Useful Resources:
Getting Set Up
So the first thing you need to do is Install python if you already haven’t already.
Make sure to tick the box ‘add to path’ when installing. Or, if you haven’t done that, follow this tutorial as we will need to use ‘pip’, the python package installer, to install PyCardano.
Next, we need to install an IDE, I would recommend two, PyCharm or VsCode, although if you want to programme in the pre-installed IDLE, that’s fine too.
Now you have your IDE up, open a terminal and run the following.
pip install pycardanoThat should install the pycardano module. If you’re getting a pip is not recognised error, make sure you have added it to path as mentioned above.
Keys and Addresses
The most common keys in Cardano are payment key and stake key. They are both Ed25519 keys.
The Payment key is usually used to sign transactions that involve funds transfers, while stake key is usually used to sign transactions that involve staking-related activities, e.g. stake address registration and delegation. PyCardano provides APIs to create, save, and loads payment keys and stake keys.
If you know anything about public private cryptography you would know that there are two parts to a Key,
The private key – The one used actually to sign transactions.
The public key – The one used by others to verify you signed the transaction with your private key.
In the case of PyCardano, these are called the signing key and verification key.
Create a key pair like below in a new python file:
from pycardano import PaymentSigningKey, StakeSigningKey, PaymentVerificationKey, StakeVerificationKey

payment_signing_key = PaymentSigningKey.generate()
payment_verification_key = PaymentVerificationKey.from_signing_key(payment_signing_key)

payment_signing_key.save("payment.skey")
payment_verification_key.save("payment.vkey")
In the code we generated a signing key, AKA the private key and then derived the public key from it. If you run this code, you will also notice two new files that appear in your folder. Now we can load the keys at any time and generate the addresses if we need.
Lets test it, create a new file and run the code below to sign a message
payment_signing_key = PaymentSigningKey.load("payment.skey")

print(payment_signing_key.sign(b"Hello world!"))
The output should be something similar to this
b"\xf8\x13`\xe6\x0c0W\xc4}\xacI'\x853\xe3\xe9!\xce\xd1\x98'{\xe0\xb4\r\x13\t\xcd`\xb9m\xb1+O DX\xd7G\rQ\xcf\x88\x1c\x8d\x001\tVPf\x15\x8a\xf9~\x94\x88\xf3\x0b\xee\xcb\x14\x8f\x06"The Address
There are four different types of addresses used in Cardano. The one you will be most familiar with if you have set up a wallet is a base address. This is one that has a signing key for transactions and a stake key.
To keep things simple and not generate stake keys, although you can use this code if you wish to generate a stake key pair.
stake_signing_key = StakeSigningKey.generate()
stake_verification_key = StakeVerificationKey.from_signing_key(stake_signing_key)
The other address we will be working with today is an Enterprise address. Simply put this is an address that can sign transactions but does not have a stake key.
So let’s create the address from the keys we generated before, this is what you whole file should look like. note we only need to import the verification key and not the signing key.
from pycardano import PaymentSigningKey, StakeSigningKey, PaymentVerificationKey, StakeVerificationKey, Address, Network

payment_verification_key = PaymentVerificationKey.load("payment.vkey")

enterprise_address = Address(payment_part=payment_verification_key.hash(),
                             network=Network.TESTNET)
print(enterprise_address)
You should see an address output
addr_test1vqjpasmnwsh7plqc6r6anrdl0gup9p0gz5ymt5tdtwhvlgqxtc8txOk, now we have an address, lets get some ADA into it. Use the Cardano Faucet to get some ADA into this address. Use the preview testnet.
Querying Blockfrost
So currently we have now way to actually look at the on-chain date with our code.
To do so we need a full ledger of the blockchain to take a look at, i.e. a full node. Now as this is a beginner tutorial, we don’t really want to go setting up a full node just to send one transaction.
Thats where blockfrost comes in, they set up the node and allow us to query the ledger and submit transactions through their API.
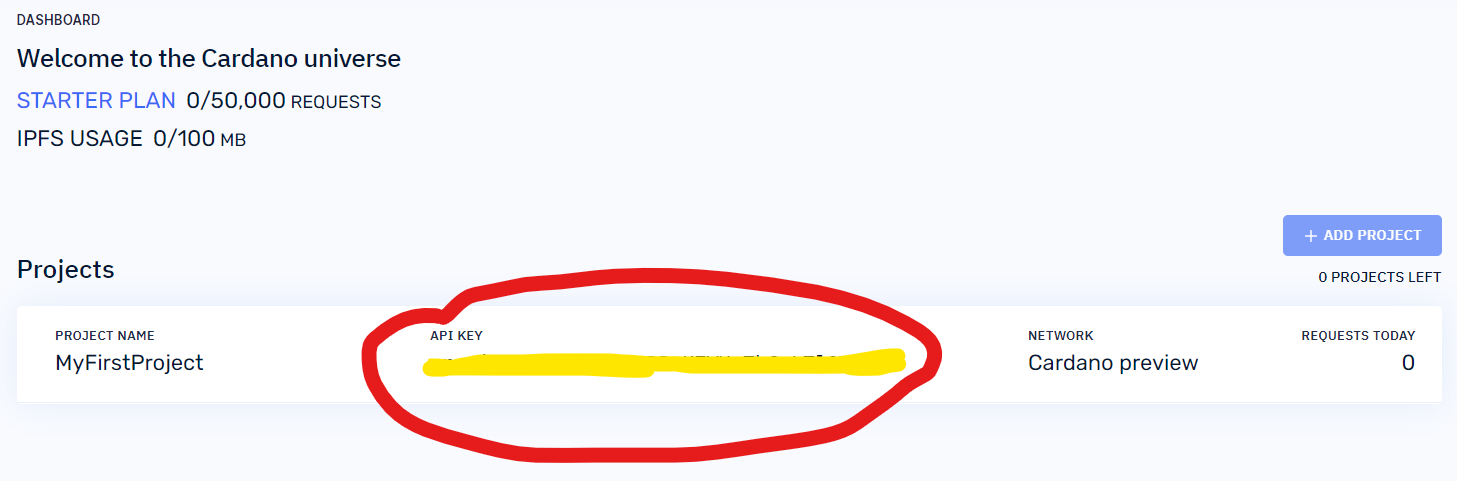
Go and set up a free account with Blockfrost, add a project and get your API key as seen below.
Using thier Utxo API endoint we want to see all of the Utxo’s related to our adress we generated before.
from blockfrost import BlockFrostApi, ApiError, ApiUrls

api = BlockFrostApi(project_id='YOUR API KEY',base_url=ApiUrls.preview.value)

try:
    health = api.health()
    print(health)
    address = api.address_utxos(
        address='YOUR ADDRESS')
    print(address)
    for amount in address:
        print(amount.tx_hash)

except ApiError as e:
    print(e)
Copy the above code, make sure to put in your API key and the Address we created before.
Run the code, you should see the following:

The top line is the health of the API
The second is a list of all of the Utxo’s associated with your address
and the last line are the transaction hashes, here, we only have one as there has only been one transaction from the faucet.
Making a transaction
For a transaction, we need two addresses, an address from and an address too.
Challenge 1 – We need a second address to send some ADA to, use the code from the first section to generate another key pair and save them. Then generate an address from that. Remember to change the file name when saving they key pair!
Setup – In a new file paste the following
from pycardano import Address, PaymentSigningKey, TransactionBuilder, \
    TransactionOutput, BlockFrostChainContext, Network


network = Network.TESTNET
context = BlockFrostChainContext("YOUR API KEY", network, base_url="https://cardano-preview.blockfrost.io/api")
Make sure you put in your API key
Next lets setup the addresses
address_from = 'addr_test1vqjpasmnwsh7plqc6r6anrdl0gup9p0gz5ymt5tdtwhvlgqxtc8tx'
sk_path = 'payment.skey'

address_to = 'addr_test1vqjpasmnwsh7plqc6r6anrdl0gup9p0gz5ymt5tdtwhvlgqxtc8tx'
Note the signing key path variable. For the address from we will need to sign the transaction with the signing key.
Building the transaction:
tx_builder = TransactionBuilder(context)
tx_builder.add_input_address(address_from)
tx_builder.add_output(TransactionOutput.from_primitive([address_to, 5000000]))
payment_signing_key = PaymentSigningKey.load(sk_path)
Signing and submitting:
signed_tx = tx_builder.build_and_sign([payment_signing_key], change_address=Address.from_primitive(address_from)) context.submit_tx(signed_tx.to_cbor())Note that when we sign the transaction, we specify the address we want to send the change to. Check out my article on EUTXO’s to learn more. Basically, the input to the transaction is the whole amount of ada from the Faucet. This gets broken down into the amount sent to the other address, the transaction fee and the remaining Utxo, which should be sent back to the Address from where the transaction came.
Now if you run all that code and don’t get an error message, your transaction has been submitted.
Challenge 2 – Now, let’s check that the address we sent the funds to has actually received it. Modify the Blockfrost API call querying the UTXO endpoint to look at the new address.
p.s. if you do this instantly after submitting a transaction, you may not get anything back as it takes a short amount of time for the transaction to go on chain.